28 March 2012

Sunshine, swaps & stitches

Hello there!
I hope you had a great weekend...Here on the North Coast we have had the most unbelievable sunny weather, so lots of gardening done.. and a little sewing to show you
First up is the March block for our do. Good Stitches bee. March is Kat's turn to be queen bee &, rather than make a block, she has given us the opportunity to make any type of wee quilt top we would like. Kat runs a bee which donates blankets to sick & premature babies in her local hospital so this is what went off to her to-day...As a neonatal doctor, I know the trauma and anguish of parents who's little ones are sick and suffering, so it is a real privilege to be able to support Kat's great work
Next is the very first Care Circle quilt for our do. Good Stitches bee...
I'm so thrilled how those starflowers have come together
Doesn't it look wonderful? Thanks so much to Cindy, Annabella, Kat, Delores, Kylie, Kristin, Leanne, Bronica & Lucy.
When I was at the post office, the wee post man happened to mention that there was a parcel for me & look what was inside:
Its from my secret Mouthy Stitches swap partner Jennifer (aka Ellison Lane Quilts) Isn't the pouch gorgeous - here's the back view
I just love that wee birdie - it just makes me smile! :)
Last up are the blocks I've been working on for my doll quilt swap partner.... I'm hoping she will like them
I just have to work out what colour of sashing to use... any thoughts?
I hope you all have a great day....I'll be back on Thursday with the last stage of our Irish Road Trip...and the giveaway details! See you then!
Take care
Karen


23 March 2012

An Irish Road Trip {part five}: Galway Greetings!


Hello there!
I hope you have had a great week! Here on the North Coast we have been enjoying lovely spring sunshine & gorgeous early blossom
& vibrant spring colours
To-day as part of our road trip we are travelling the width of Ireland, from Belfast in the east to Galway in the west, to meet Ger and Eva from Pippablue. 
They sell wonderfully quirky fabric & bits & pieces like these clothes plasters
or this gorgeous trim
You're very welcome ladies!
First of all, we'd like to thank Karen for inviting us to participate in her Irish Road Trip. For those of you who don't know us, we are two friends, Ger and Eva, who have a little studio shop in Galway City, called Pippablue. We like to sew, knit and crochet, and as well as selling lovely fabrics, yarns and crafty supplies, we offer classes and workshops in our new studio premises.
Everybody knows that we do enjoy a cup of tea, here in Ireland, or as you'd say in Irish a "cupán tae", so in the spirit of this Irish tradition we made a tea cosy using some lovely Melody Miller fabric and some machine embroidery. We love Japanese fabrics here at Pippablue, and the teacup print from the Ruby Star Rising collection was just perfect for this project!
We chose a plain Klona Cotton in jade green for the body of the teacosy ( ad to be green, of course!).  This fabric is a fab quality, and really easy to sew with, and embroider on!  The lining for the cozy is a fun, red polkadot cotton poplin... (these are my go to fabrics for linings and binding, they go with everything and they are a easy on the wallet!) We then ironed some BondaWeb on the wrong side of the teacup fabric. This makes the fabric feel almost like paper and it becomes really easy to cut the tea cup and teapot shapes neatly and close to the edge! You can then peel the paper off your shapes and position them where you like on your plain fabric for the cozy. When you are happy with the placement press them with your iron, and they will stay put for you to embroider on.
Then you can use your sewing machine like a pencil and sew around your shapes, and even add in some shading around the edges. This works best if you use a darning or embroidery foot on your machine, and it is easier than it looks! Another trick is to stretch your fabric in an embroidery hoop before you start sewing, this will keep the fabric taut and make it easier to move while embroidering 
The stitching doesn't have to be perfect and if you go around each shape a few times, it creates a sketchy, hand drawn look.  If your feeling brave, why not try stitching in a few words... as Mrs. Doyle would say " Go on, Go on, Go on.." give it a try! If you are looking for a tutorial for a basic Tea cozy there are loads of really good ones on the internet, we used this one at Homemade Holiday Gifts to get our basic pattern!

That's all for now. We hope you enjoyed this mini-tutorial, and if you are ever in Galway, please stop by for a visit!

Thanks so much Eva & Ger! 
I hope you have all enjoyed your visit to Galway... do drop back in a day or two for our final installment of the Irish Road Trip & the great giveaway news!! 
In the meantime, have a wonderful weekend, & if you live in the UK, don't forget about the clocks!!
Take care
Karen

21 March 2012

An Irish Road Trip {part four}: back to Belfast

Hello there & welcome back to the fourth part of our Irish Road Trip. 

I've so enjoyed introducing you to some Irish stitchers & reading all your comments. Thanks so much for each one of them! If Sarah's fab tutorial has got you all hooped up - here's some more hoopy inspiration for you:
A table decoration
source: ruffledblog.com
A clock
source: blogs.babble.com
Swatch wall art
source: purlbee.com
And, seeing as we are on an Irish Road Trip...hoop map-art
So, to-day we are coming back up north from Cork (which is at the very bottom of my hoop) to Belfast (which is at the top right of the hoop) to call in with the lovely (& very talented) Judith.....
Hi, I’m Judith from Just Jude (previously Rags to Bags). I’ve lived in Belfast for 15 years now; before that 7 years in Bournemouth, and before that, a sleepy village in Co. Armagh, Northern Ireland. I’m married almost 20 years, and have 3 daughters and a pet goat disguised as a dog! I’ve been a self-employed Patchwork and Quilting Tutor for 3 years now, after returning to college as a mature (very!) student to study the City & Guilds certificate in Patchwork & Quilting.  I’ve been sewing since the age of 12ish, when I inherited my Gran’s treadle singer, and crocheting since the age of 8.
Being self-employed means long hours working on your own, keeping yourself motivated and inspired, which can be difficult at times.   
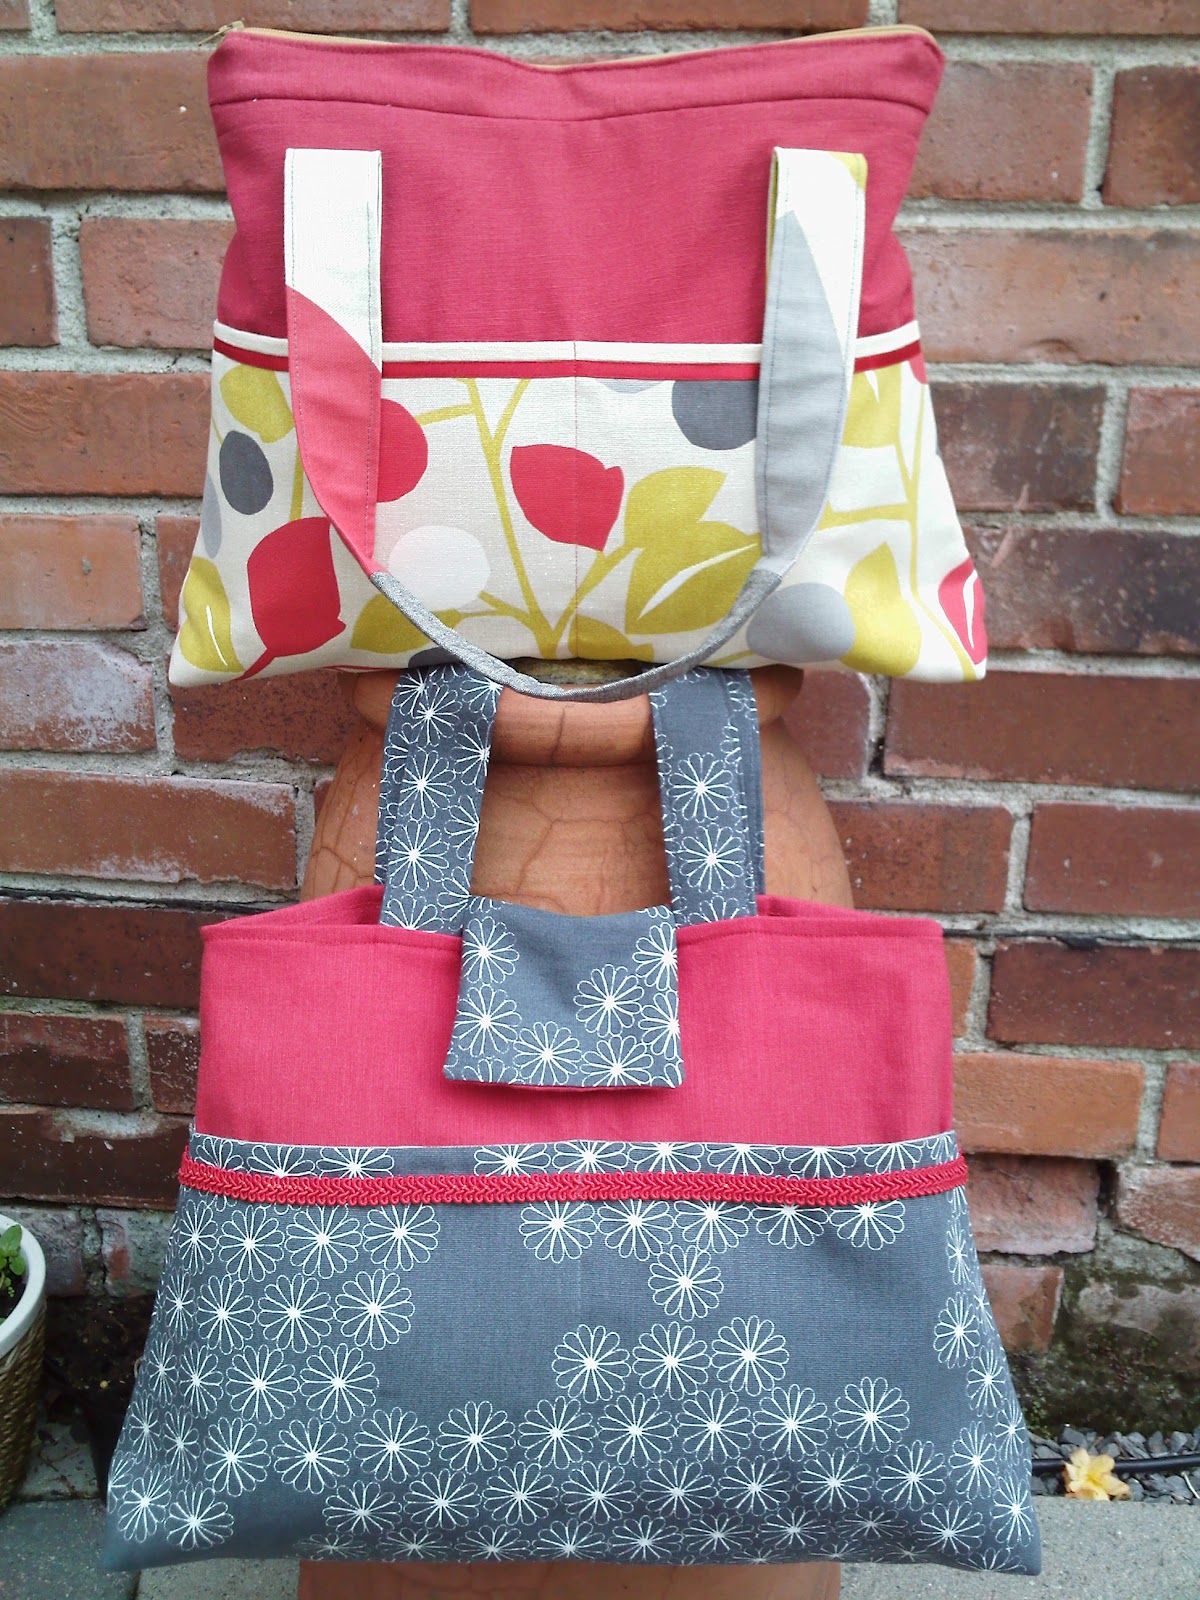
The 'Martha May' Handbag
So when my friend Sarah introduced me to blogging over a year ago,  a world of inspiration, motivation and of course wonderful friendships opened up to me! 
'Value Charm' quilt 2011
I love being in Bees and swaps.  One group in particular that means a lot to me is the Brit Bee – a group of 12 nutty lovely ladies who have become my friends, and who I get the amazing privilege of meeting for real at the FQ Retreat in June this year!  Squeeee!!
My foundation pieced 'Foody/Kitchen item' for Ceri (Miss March)
The amazing talent and generosity that is the quilting blogging community inspired Sarah and I to start up our own charity Bee, called Bee Blessed, in September '11.  The aim of the Bee is to make quilts to donate to needy families in our area. A physical group of ladies meet every 3 weeks to sew quilts.  But we are also supported and massively encouraged by 30 online members, who faithfully make blocks, donate fabrics and show an interest in what we are doing. 
A selection of Bee Blessed Quilts
Without the support of the blogging community, Bee Blessed couldn’t be the productive wee group that we are able to be.  This Bee is open to anyone who would like to make a block or two, donate some fabric, or call in and sew with us if you live in or near the Belfast area.

So as this is a tour of Ireland, I thought I’d take you on a mini tour of the area of Belfast where I live.  I live on the Eastern side of Belfast, which is famous for these well known sights.
Harland & Wolfe cranes, called 'Samson' and 'Goliath'
Stormont Parliament Buildings
Titanic Dry Dock
In fact, this is a hugely significant year for Belfast and the new Titanic Quarter Development in particular, because 15th April marks the 100th anniversary of the sinking of the Titanic, which was built just 5 minutes away from my house!
The new Titanic Museum
Sadly Northern Ireland in general, and Belfast in particular, has also been well known for other reasons.  There is a longstanding history of violence in our island, a troubled and hurting land that politically tore itself apart.  
I grew up during one of the worst periods of The Troubles, but I'm pleased to say that the Northern Ireland I'm living in now is vastly different to back then. We are enjoying peace in our land now, albeit fragile at certain times of the year.  Belfast is a thriving Metropolitan city, with much to offer visitors and locals.  Despite still being a country girl at heart, living in a City means I have the advantages of living 15 minutes from a beach, 5 minutes from an airport, 10 minutes from City Centre shopping & don't have to walk far to get to one of the 44 parks in Belfast. We also have a zoo, a castle, several harbours and much more.  The only thing we are sadly lacking are modern fabric shops!! Perhaps one day I'll be able to teach my classes in my very own fabric shop in Belfast!  Now there would be a dream come true!
Thanks for reading my mini tour story.  You are most welcome to call in with me over at Just Jude for a wee chat.  I love getting comments from folks and I always reply!

Thanks Judith!
I'll be back on Friday with another stop-off on our road trip, hope to see you then
Take care
Karen

19 March 2012

An Irish Road Trip {part 3}: Hooping it up in Cork!

Hello there!
Thanks so much to those of you who sent me such lovely get-well wishes... those wee comments were the perfect medicine! :)
I hope you all had a great weekend &, if you are a UK mummy, a wonderful day yesterday! I had a lovely day with the family & my mum & dad with yummy food & a great game of Monopoly - which I won (for the first time ever!!)... but back to our Irish Road Trip.... 
We're off on a long journey to-day, from the very North of Ireland to the very South, all the way down to Cork to meet up with the talented Sarah of Fairy Face Designs. Over to you Sarah....
I was thrilled to be asked by Karen to take part in her tour of Ireland! What a great idea and so much fun!

Living in Cork, I am the southern part of the tour - and even though I am not a Corkonian by birth, the 11 years I have spent living here have certainly seen the south of Ireland steal a little piece of my heart! If you've never visited the south - and west Cork in particular - you are certainly missing out, it is an amazing, wild, beautiful place and once you've been there you'll want to come back again and again.
But - on to more sewing related themes! Today I have a quick and easy tute for you to help you bring a little handmade touch your interior decor. Have you ever made a hoop to hang on the wall? They are quick, easy and versatile - they can be as simple as stretching a favourite piece of fabric in the hoop or free embroidering a little picture or design. You can embellish them with buttons, beads, ric rac, ribbon etc - really, they are an endless source of entertainment!

Today, I wanted to replace a picture hanging in my little girl's bedroom. Since turning 4 last month, a few things need freshening up - as she tells us, she is no longer a baby! So I decided to do a little scene for her.

Here's what you need for something similar:
1 embroidery hoop - size up to you!
Piece of solid fabric for background
Fabric scraps
Ribbon
Buttons
Fabric glue
Small piece of fusible web (I used the stuff for repairing hems, it was perfect) and a piece of tear-away stabilizer (I used Vlieseline Stickvlies)


To Make:
1. Decide what picture you want to make and how you will compose it. My daughter loves balloons so I decided to do a little picture of her outside a house with lots of balloons in her hand. If it is a complicated one, you might want to draw a sketch first - for this I didn't need to.
2. Press your fabric, then press the stablizer to the back of it (it will "stick" to your fabric but is not permanent)
3. Take your interior hoop and lay it on the fabric and trace around the outside edge to give you a guide. I used a Hera marking tool, you could use the blunt edge of a scisssors, a water soluble pen or a light coloured pencil.
4. Now take your fabric and scraps over to your ironing board, lay your fabric flat and cut and arrange your scraps as you want them. Be sure to include any embellishments you are using.
5. Once you are happy, cut tiny bits of the fusible web and fix your scraps in place with it, I just put a dot in the centre of each piece, enough to stop it moving when I was sewing it.
6. Mark where any buttons/beads will go and then set them aside for the moment.
7. Put your free motion foot on your machine and drop your feed dogs. Using a black thread, sew around each of the scraps to outline each part. This is supposed to look a bit wonky and quirky so crooked lines etc are fine! I added a spiral line of smoke to my chimney. I then used my machine to "draw" legs and arms, a head and some hair for my little girl figure. I changed thread to do the balloon strings. Leave a decent tail of thread each time you stop to make it easier to sew in your threads, it will look very messy before it is done!
8. Once you are done with the outlining, take a hand sewing needle and bring all your thread tails through to the back of your piece. I then knotted my threads to secure and snipped them close to the knot.


9. Sew in your buttons and any embellishments. I added eyes and a mouth to my girl's face using perle cotton.
10. Place your fabric over the interior hoop and then put the exterior hoop over and tighten closed. Make sure your fabric is stretched nice and taute, but not distorted. I left my stabilizer on the back of my fabric - you could tear away if you wanted, but it helps stop any threads at the back showing through a light coloured solid.
11. Trim around the hoop - enough that you can glue it to the inside of the hoop, but not have it wider than the hoop itself. Then trim the stablizer right back to the hoop to reduce the bulk, being careful not to cut your fabric.
12. Using fabric glue, carefully glue the raw edges to the inside of the hoop, you will get a bit messy doing this and might need to hold in place for a minute or two to get it to stick.
As I was making this for my own house and it would be hung on the wall, I didn't bother covering the threads at the back. However, if you were giving it as a gift and wanted the back to be nice and tidy, cut a piece of felt or fabric to fit inside the hoop and just covering the raw edges that you have stuck down and use a little glue to fix in place.
13. Add a ribbon tie and ta dah! Your hoop is done. Hang and admire :-)
As I said, you can do lots of different things with hoops - here are a few more I made last year. This was made with appliqued circles, and hand stitched with perle cotton:
And this very simple Christmas hoop was made with a few scraps of fabric and some hand stitching:
I hope you enjoyed this short tute - please pop over to say hi to me at FairyFace Designs and let me know if you have any questions! Thanks so much Karen for inviting me to take part!

Thanks so much Sarah... I love that wee house! :) As Sarah said, you can do so much with hoops, here's one I made for a swappy partner to hold her sewing bits & pieces:
Well, I hope you all have enjoyed our wee visit to Cork... we're heading west next, so do drop by soon to meet some more inspiring Irish stitchers!
Take care
Karen 

16 March 2012

An Irish Road Trip {part 2}: Seaside Stitching

Hello there!
Its lovely to have you call back again &, before I do anything else, please forgive me for the lateness of this post... unfortunately I've succumbed to the coughs & splutters of spring & as I write I've a box of tissues to my right & a cup of hot elder flower cordial to my left....But enough of that & back to our road trip...
So to-day I thought I would share with you a little bit about life here in the very North of Ireland: a place where it is often wild, wet or windy (or all three together!), 
The White Rocks, Portrush
where we live surrounded by incredible beauty & ancient history
Portballintrae
Portballintrae
...where tradition & creativity are bound together by inspiration
Giants Causeway

Giants Causeway Quilting
Where the kettle is always on,  & friendships last for a lifetime 
& families times are precious...
Welcome to my wee corner of this beautiful country!
I'd love for you to share something of this part of the world with me, so I've designed a wee bag for you which is made up of four petals, just like the clover leaves....
Here is the pattern:
I hope you enjoy it!
I'm off now to find some more tea, but if you are able, come back soon when we will be going a little further south on our Irish Road Trip..
Take care
Karen